---
dimensions:
type:
primary: reference
detail: examples
level: intermediate
standard_title: Develop A Slack Bot Plugin
language: en
title: Develop A Slack Bot Plugin
description: This guide provides a complete walkthrough for developing a Slack Bot
plugin, covering project initialization, configuration form editing, feature implementation,
debugging, endpoint setup, verification, and packaging. You'll need the Dify plugin
scaffolding tool and a pre-created Slack App to build an AI-powered chatbot on Slack.
---
**What You’ll Learn:**
Gain a solid understanding of how to build a Slack Bot that’s powered by AI—one that can respond to user questions right inside Slack. If you haven't developed a plugin before, we recommend reading the [Plugin Development Quick Start Guide](/plugin-dev-en/0211-getting-started-dify-tool) first.
### Project Background
The Dify plugin ecosystem focuses on making integrations simpler and more accessible. In this guide, we’ll use Slack as an example, walking you through the process of developing a Slack Bot plugin. This allows your team to chat directly with an LLM within Slack, significantly improving how efficiently they can use AI.
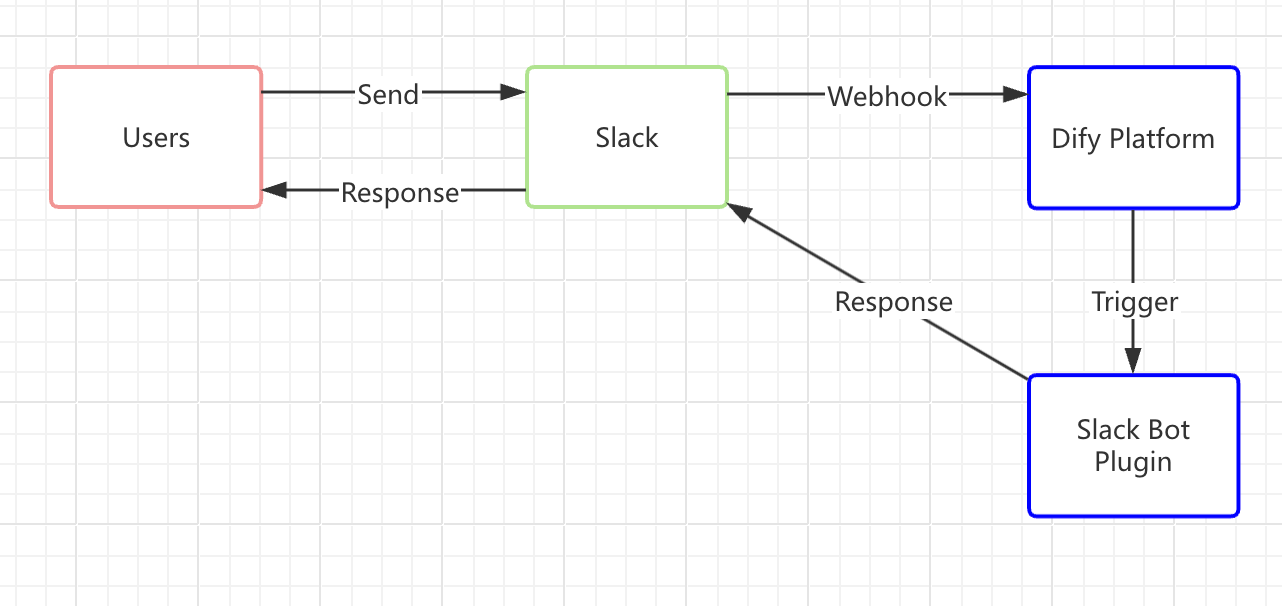
Slack is an open, real-time communication platform with a robust API. Among its features is a webhook-based event system, which is quite straightforward to develop on. We’ll leverage this system to create a Slack Bot plugin, illustrated in the diagram below:
> To avoid confusion, the following concepts are explained:
>
> * **Slack Bot** A chatbot on the Slack platform, acting as a virtual user you can interact with in real-time.
> * **Slack Bot Plugin** A plugin in the Dify Marketplace that connects a Dify application with Slack. This guide focuses on how to develop that plugin.
**How It Works (A Simple Overview):**
1. **Send a Message to the Slack Bot**
When a user in Slack sends a message to the Bot, the Slack Bot immediately issues a webhook request to the Dify platform.
2. **Forward the Message to the Slack Bot Plugin**
The Dify platform triggers the Slack Bot plugin, which relays the details to the Dify application—similar to entering a recipient’s address in an email system. By setting up a Slack webhook address through Slack’s API and entering it in the Slack Bot plugin, you establish this connection. The plugin then processes the Slack request and sends it on to the Dify application, where the LLM analyzes the user’s input and generates a response.
3. **Return the Response to Slack**
Once the Slack Bot plugin receives the reply from the Dify application, it sends the LLM’s answer back through the same route to the Slack Bot. Users in Slack then see a more intelligent, interactive experience right where they’re chatting.
### Prerequisites
- **Dify plugin developing tool**: For more information, see [Initializing the Development Tool](/plugin-dev-en/0221-initialize-development-tools).
- **Python environment (version ≥ 3.12)**: Refer to this [Python Installation Tutorial](https://pythontest.com/python/installing-python-3-11/) or ask an LLM for a complete setup guide.
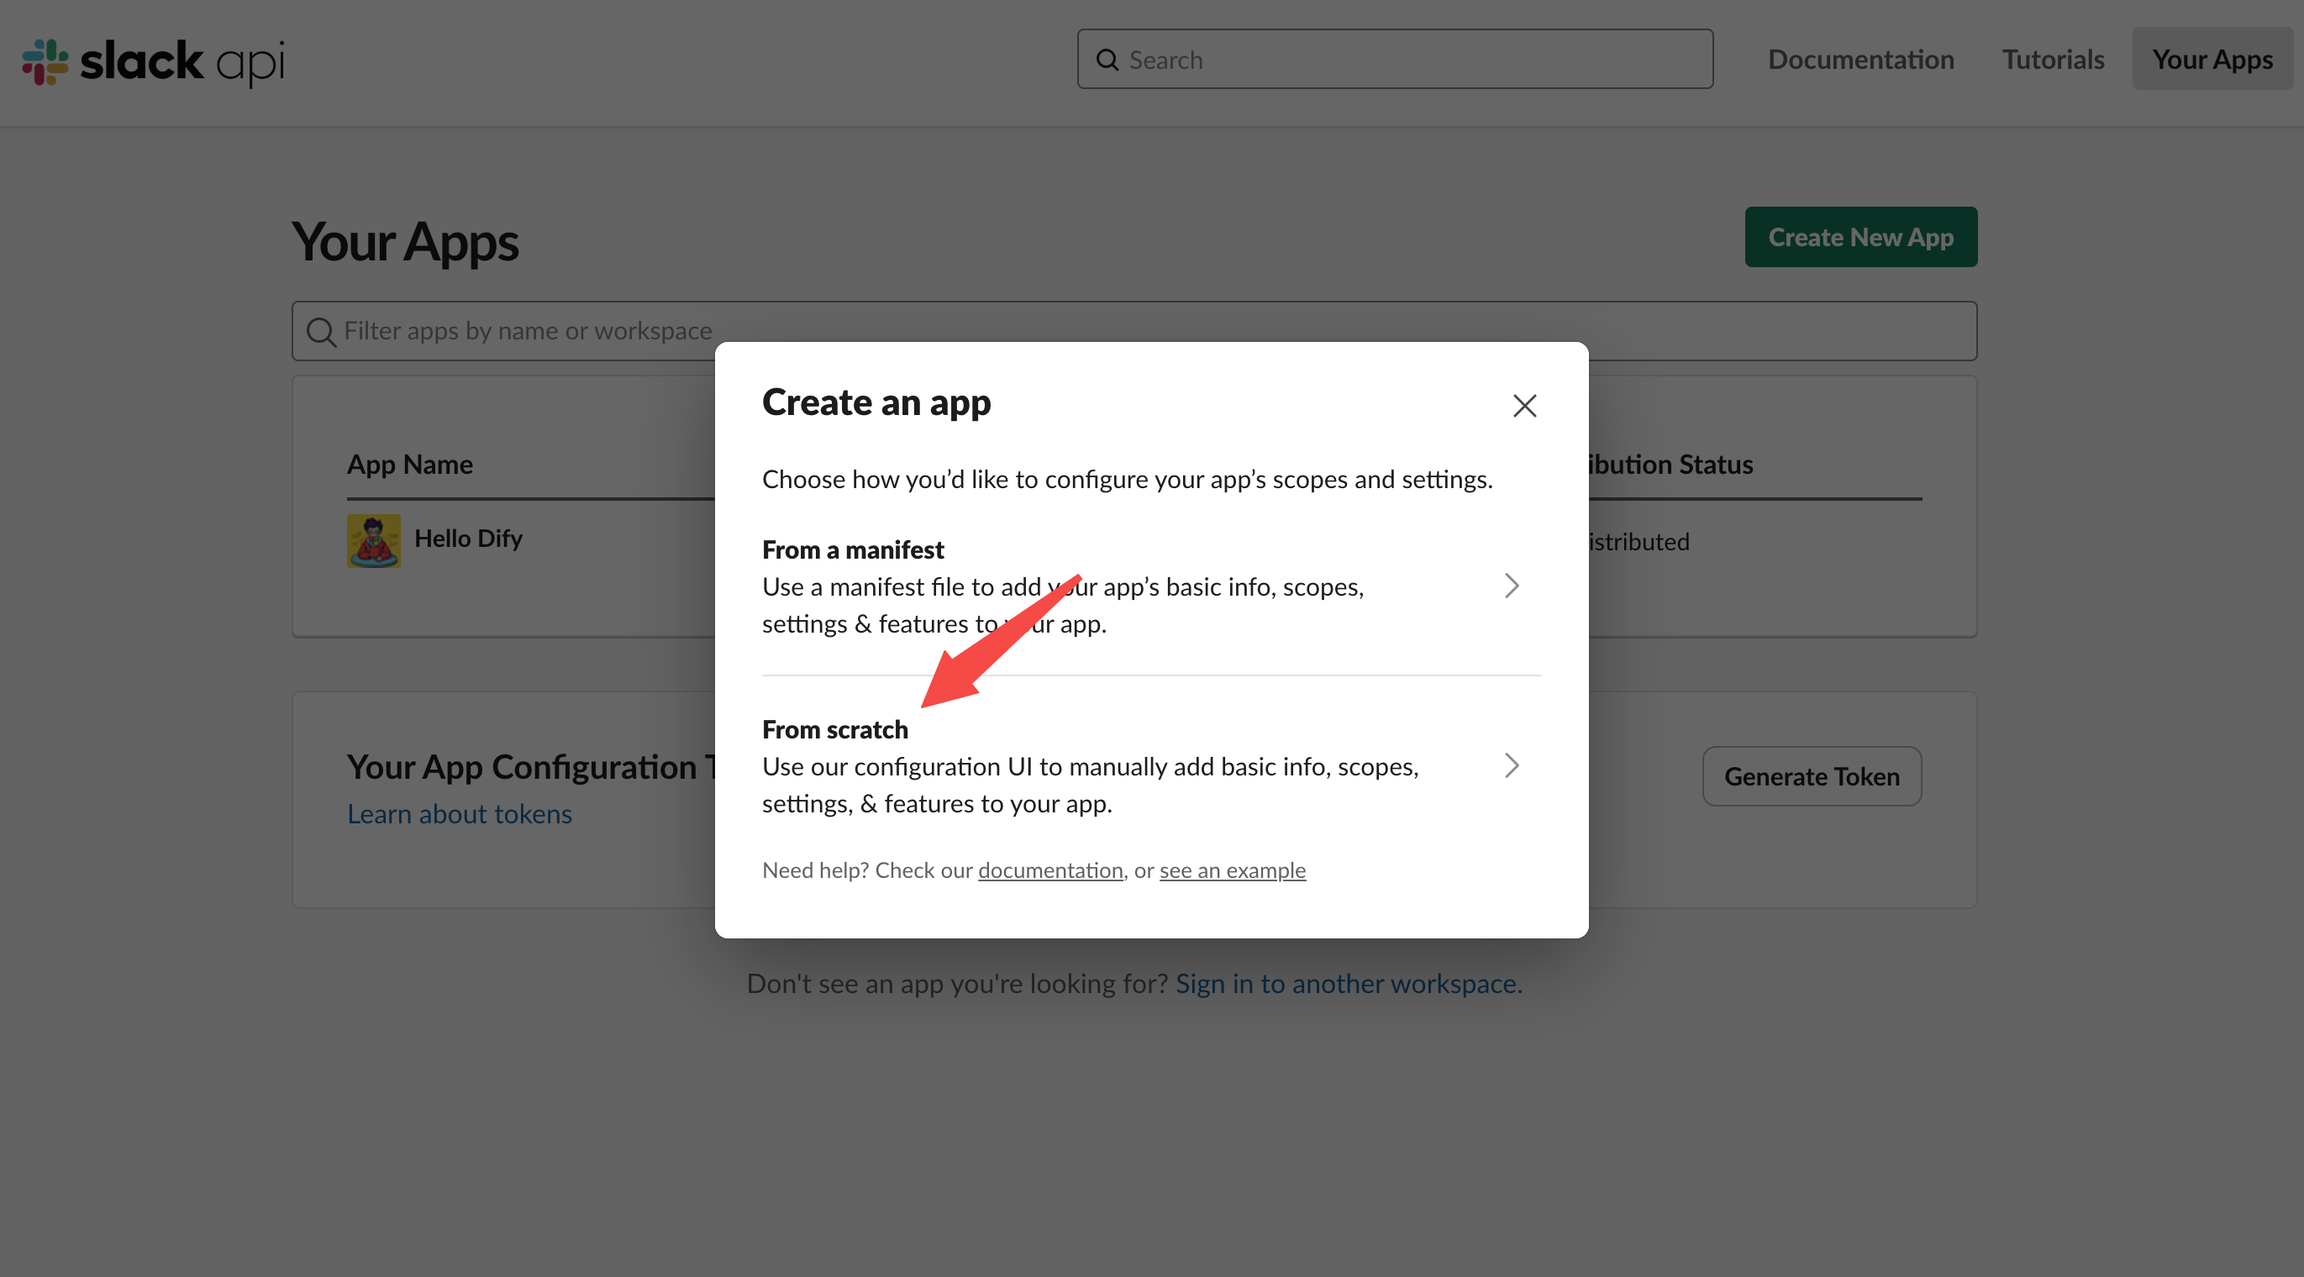
- Create a Slack App and Get an OAuth Token
Go to the [Slack API platform](https://api.slack.com/apps), create a Slack app from scratch, and pick the workspace where it will be deployed.
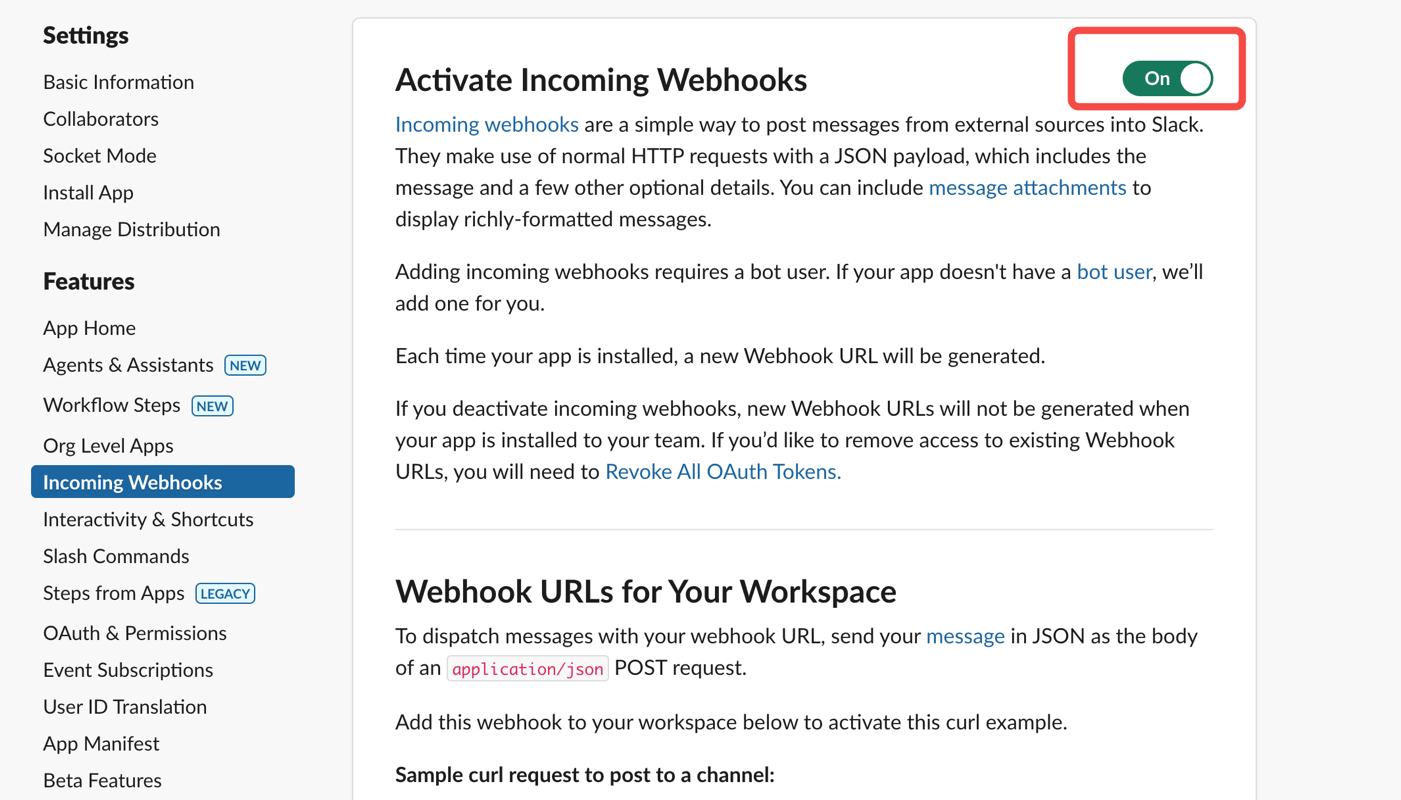
1. **Enable Webhooks:**
2. **Install the App in Your Slack Workspace:**
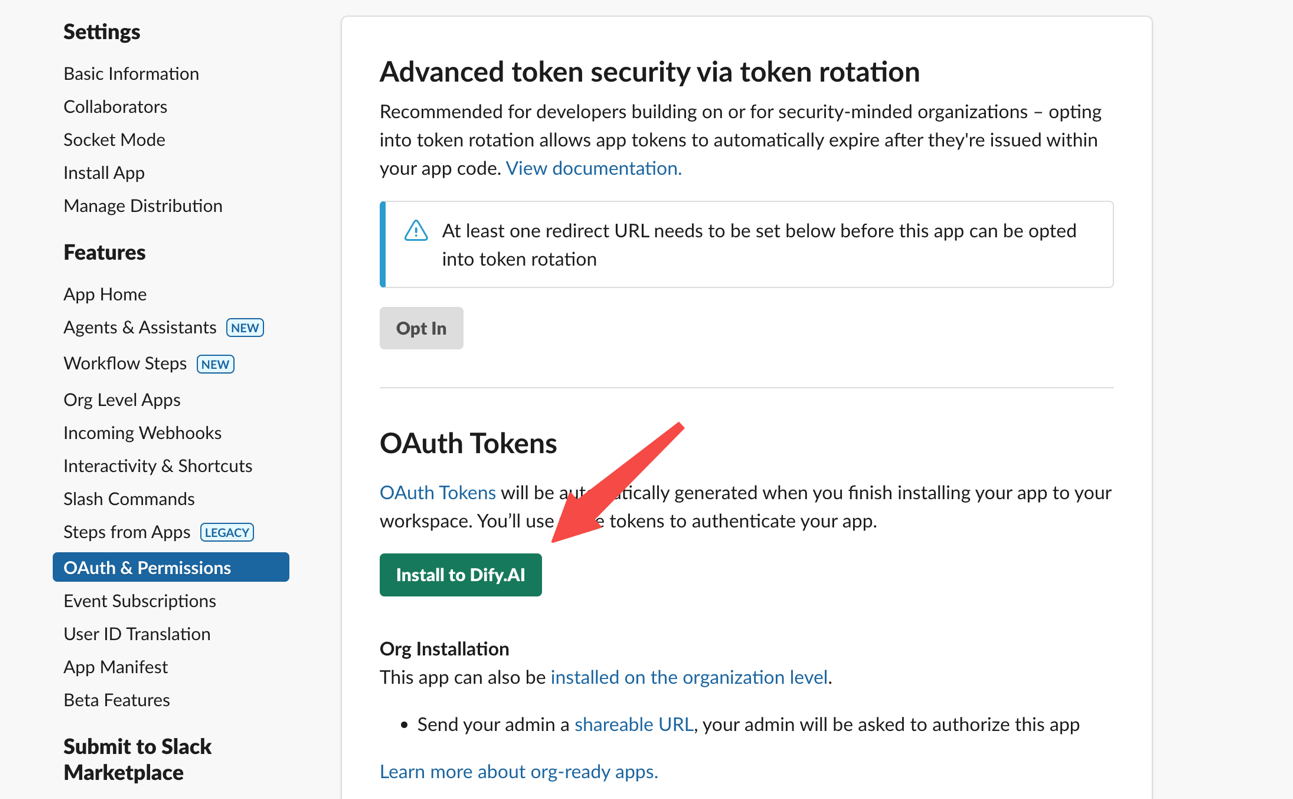
3. **Obtain an OAuth Token** for future plugin development:

### 1. Developing the Plugin
Now we’ll dive into the actual coding. Before starting, make sure you’ve read [Quick Start: Developing an Extension Plugin](/plugin-dev-en/9231-extension-plugin) or have already built a Dify plugin before.
#### 1.1 Initialize the Project
Run the following command to set up your plugin development environment:
```bash
dify plugin init
```
Follow the prompts to provide basic project info. Select the `extension` template, and grant both `Apps` and `Endpoints` permissions.
For additional details on reverse-invoking Dify services within a plugin, see [Reverse Invocation: App](/plugin-dev-en/9242-reverse-invocation-app).

#### 1.2 Edit the Configuration Form
This plugin needs to know which Dify app should handle the replies, as well as the Slack App token to authenticate the bot’s responses. Therefore, you’ll add these two fields to the plugin’s form.
Modify the YAML file in the group directory—for example, `group/slack.yaml`. The form’s filename is determined by the info you provided when creating the plugin, so adjust it accordingly.
**Sample Code:**
`slack.yaml`
```yaml
settings:
- name: bot_token
type: secret-input
required: true
label:
en_US: Bot Token
zh_Hans: Bot Token
pt_BR: Token do Bot
ja_JP: Bot Token
placeholder:
en_US: Please input your Bot Token
zh_Hans: 请输入你的 Bot Token
pt_BR: Por favor, insira seu Token do Bot
ja_JP: ボットトークンを入力してください
- name: allow_retry
type: boolean
required: false
label:
en_US: Allow Retry
zh_Hans: 允许重试
pt_BR: Permitir Retentativas
ja_JP: 再試行を許可
default: false
- name: app
type: app-selector
required: true
label:
en_US: App
zh_Hans: 应用
pt_BR: App
ja_JP: アプリ
placeholder:
en_US: the app you want to use to answer Slack messages
zh_Hans: 你想要用来回答 Slack 消息的应用
pt_BR: o app que você deseja usar para responder mensagens do Slack
ja_JP: あなたが Slack メッセージに回答するために使用するアプリ
endpoints:
- endpoints/slack.yaml
```
Explanation of the Configuration Fields:
```
- name: app
type: app-selector
scope: chat
```
* **type**: Set to app-selector, which allows users to forward messages to a specific Dify app when using this plugin.
* **scope**: Set to chat, meaning the plugin can only interact with app types such as agent, chatbot, or chatflow.
Finally, in the `endpoints/slack.yaml` file, change the request method to POST to handle incoming Slack messages properly.
**Sample Code:**
`endpoints/slack.yaml`
```yaml
path: "/"
method: "POST"
extra:
python:
source: "endpoints/slack.py"
```
#### 2. Edit the function code
Modify the `endpoints/slack.py` file and add the following code:
```python
import json
import traceback
from typing import Mapping
from werkzeug import Request, Response
from dify_plugin import Endpoint
from slack_sdk import WebClient
from slack_sdk.errors import SlackApiError
class SlackEndpoint(Endpoint):
def _invoke(self, r: Request, values: Mapping, settings: Mapping) -> Response:
"""
Invokes the endpoint with the given request.
"""
retry_num = r.headers.get("X-Slack-Retry-Num")
if (not settings.get("allow_retry") and (r.headers.get("X-Slack-Retry-Reason") == "http_timeout" or ((retry_num is not None and int(retry_num) > 0)))):
return Response(status=200, response="ok")
data = r.get_json()
# Handle Slack URL verification challenge
if data.get("type") == "url_verification":
return Response(
response=json.dumps({"challenge": data.get("challenge")}),
status=200,
content_type="application/json"
)
if (data.get("type") == "event_callback"):
event = data.get("event")
if (event.get("type") == "app_mention"):
message = event.get("text", "")
if message.startswith("<@"):
message = message.split("> ", 1)[1] if "> " in message else message
channel = event.get("channel", "")
blocks = event.get("blocks", [])
blocks[0]["elements"][0]["elements"] = blocks[0].get("elements")[0].get("elements")[1:]
token = settings.get("bot_token")
client = WebClient(token=token)
try:
response = self.session.app.chat.invoke(
app_id=settings["app"]["app_id"],
query=message,
inputs={},
response_mode="blocking",
)
try:
blocks[0]["elements"][0]["elements"][0]["text"] = response.get("answer")
result = client.chat_postMessage(
channel=channel,
text=response.get("answer"),
blocks=blocks
)
return Response(
status=200,
response=json.dumps(result),
content_type="application/json"
)
except SlackApiError as e:
raise e
except Exception as e:
err = traceback.format_exc()
return Response(
status=200,
response="Sorry, I'm having trouble processing your request. Please try again later." + str(err),
content_type="text/plain",
)
else:
return Response(status=200, response="ok")
else:
return Response(status=200, response="ok")
else:
return Response(status=200, response="ok")
```
### 2. Debug the Plugin
Go to the Dify platform and obtain the remote debugging address and key for your plugin.
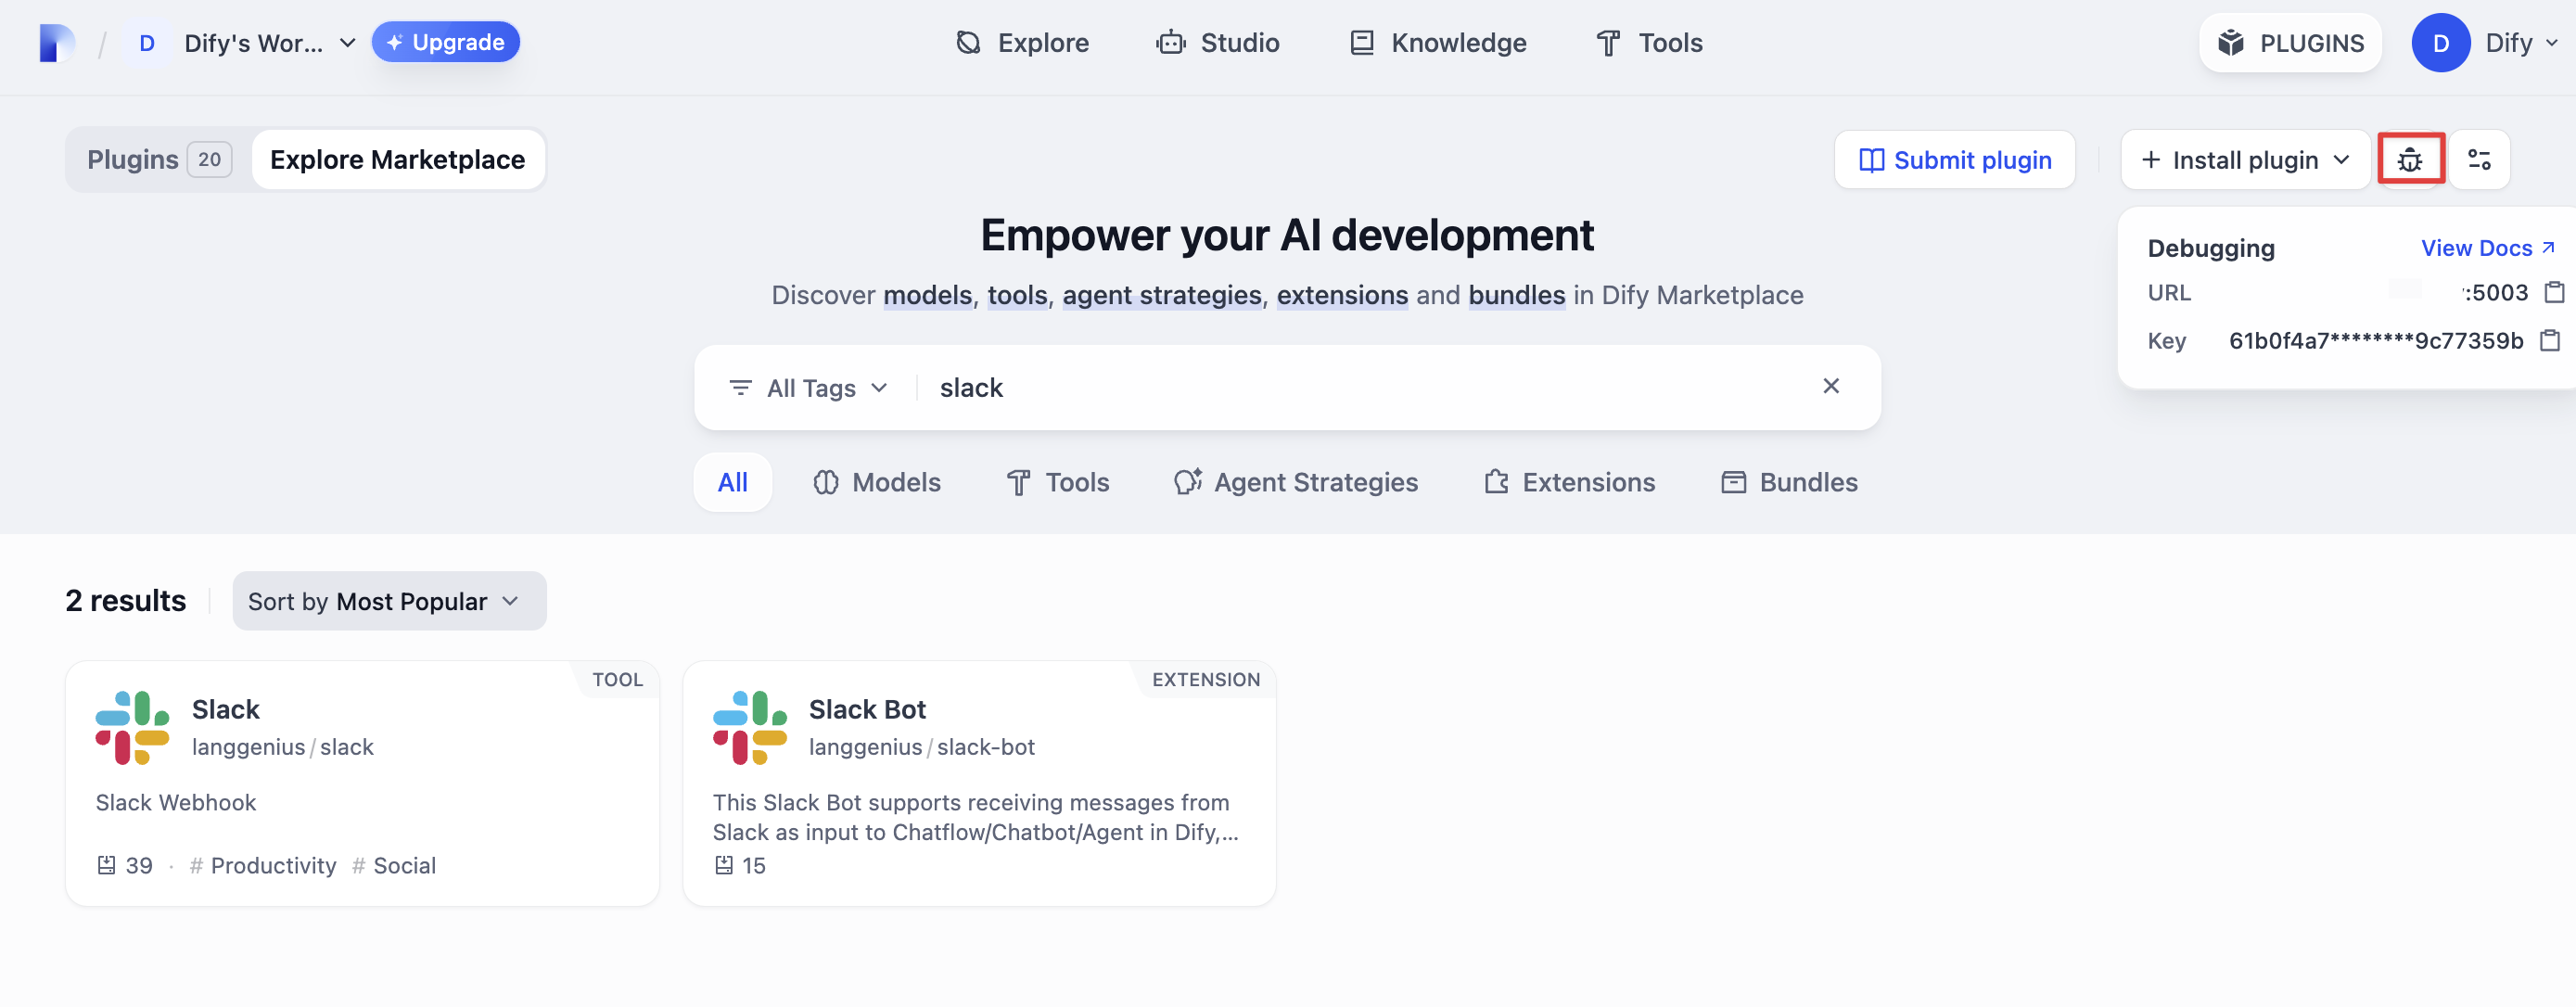
Back in your plugin project, copy the `.env.example` file and rename it to `.env`.
```bash
INSTALL_METHOD=remote
REMOTE_INSTALL_URL=debug.dify.ai:5003
REMOTE_INSTALL_KEY=********-****-****-****-************
```
Run `python -m main` to start the plugin. You should now see your plugin installed in the Workspace on Dify’s plugin management page. Other team members will also be able to access it.
```bash
python -m main
```
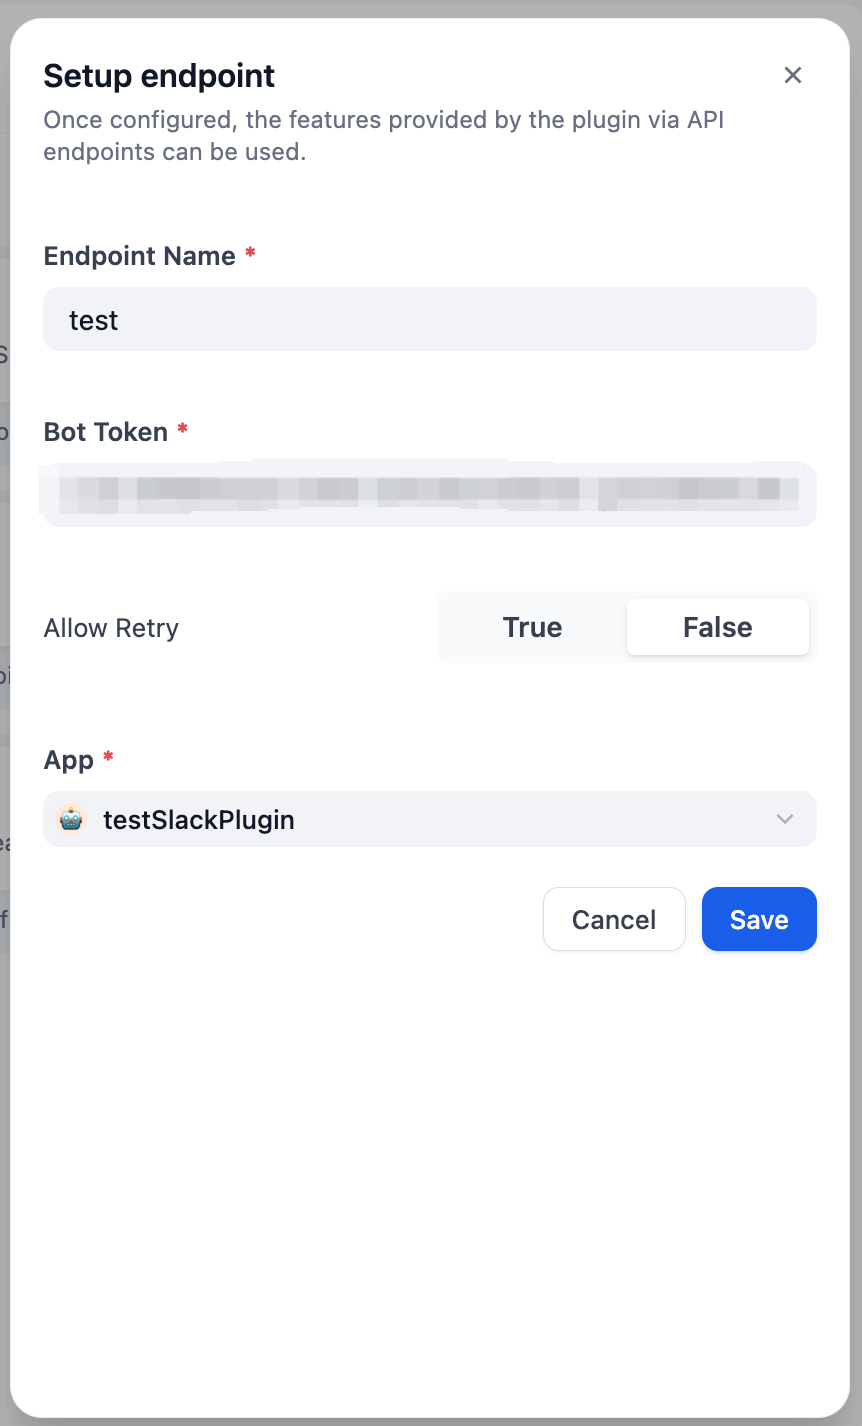
#### Configure the Plugin Endpoint
From the plugin management page in Dify, locate the newly installed test plugin and create a new endpoint. Provide a name, a Bot token, and select the app you want to connect.
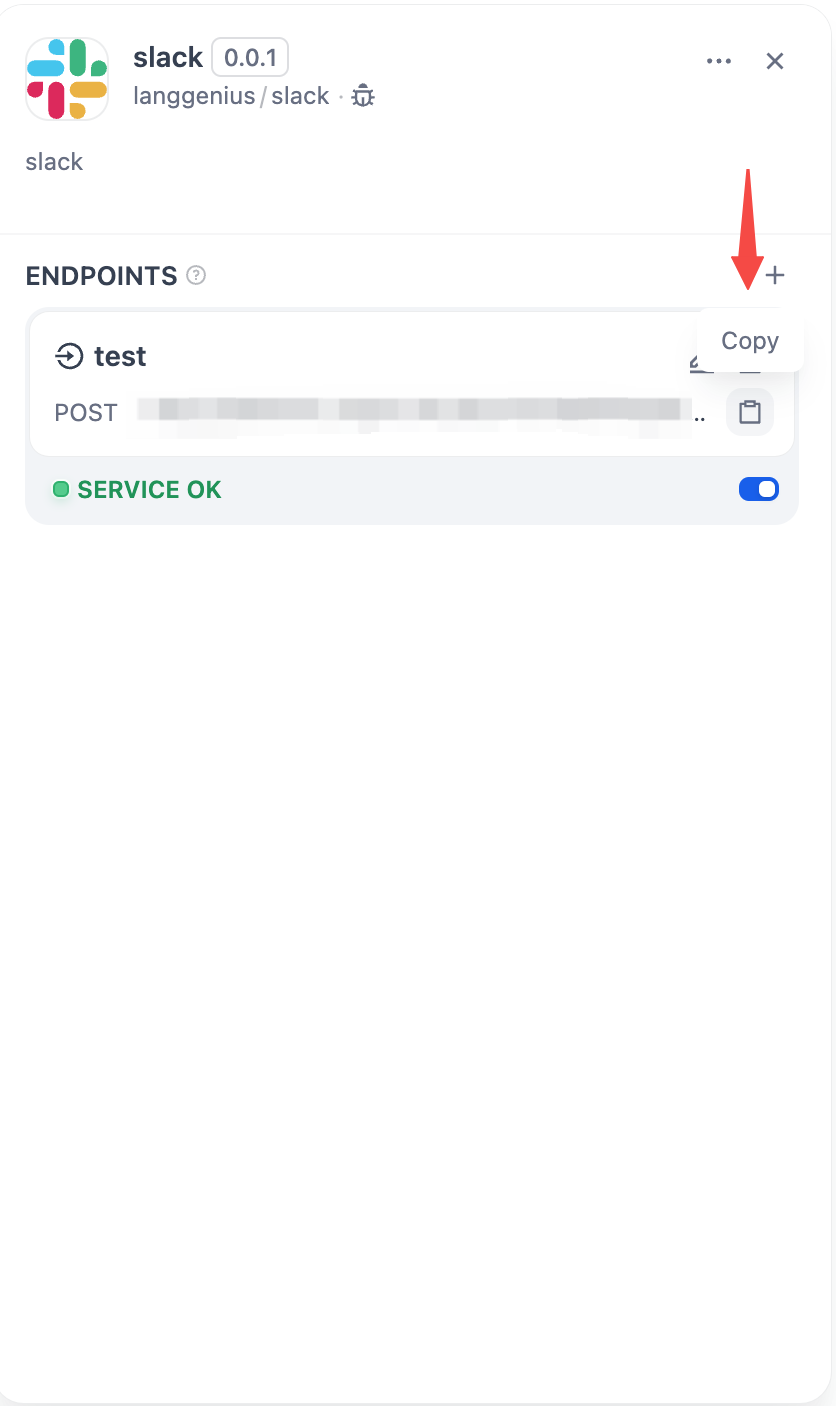
 After saving, a **POST** request URL is generated:
 Next, complete the Slack App setup:
1. **Enable Event Subscriptions**
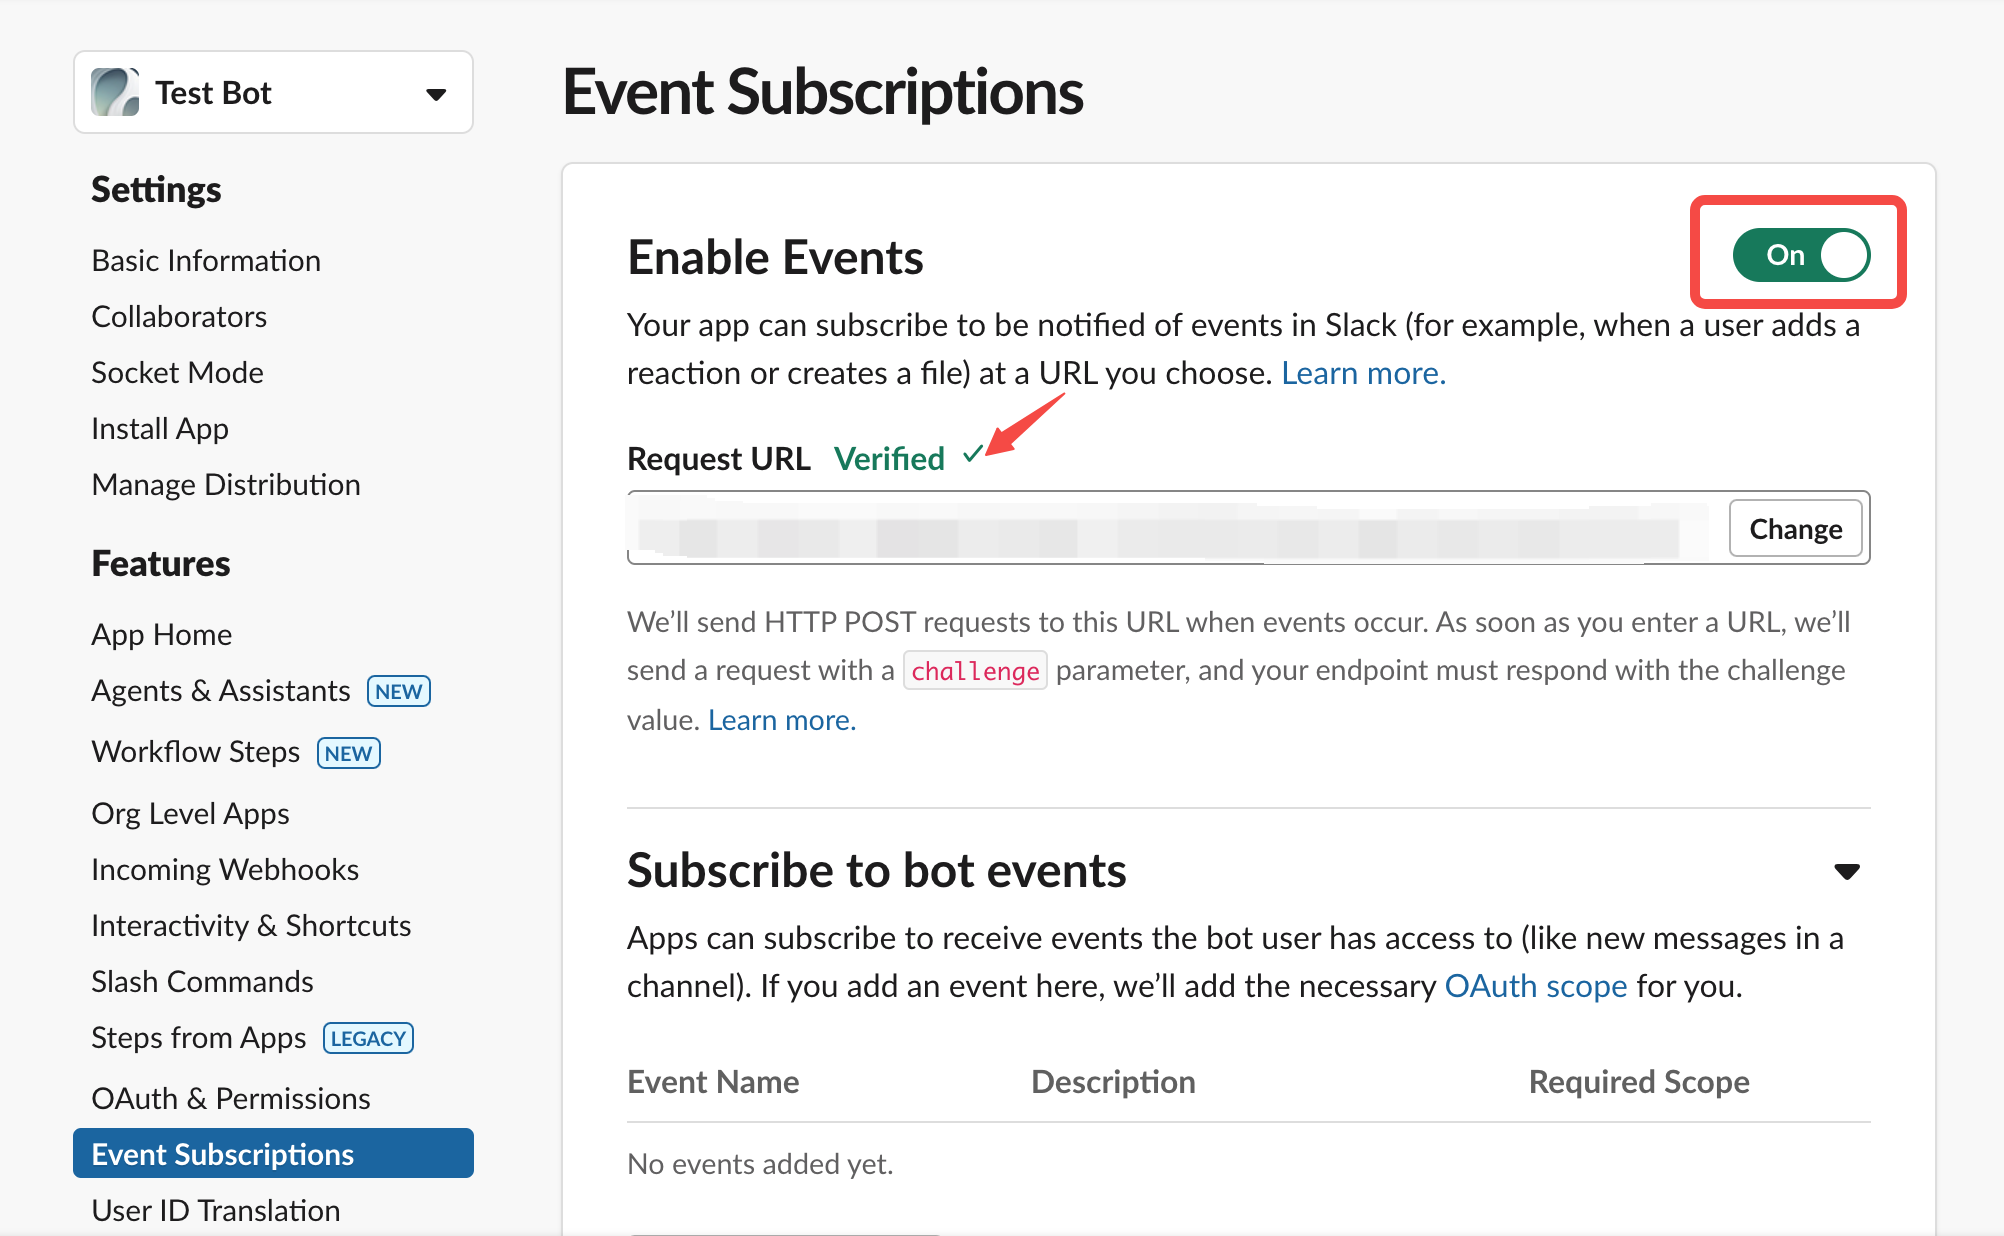
Paste the POST request URL you generated above.
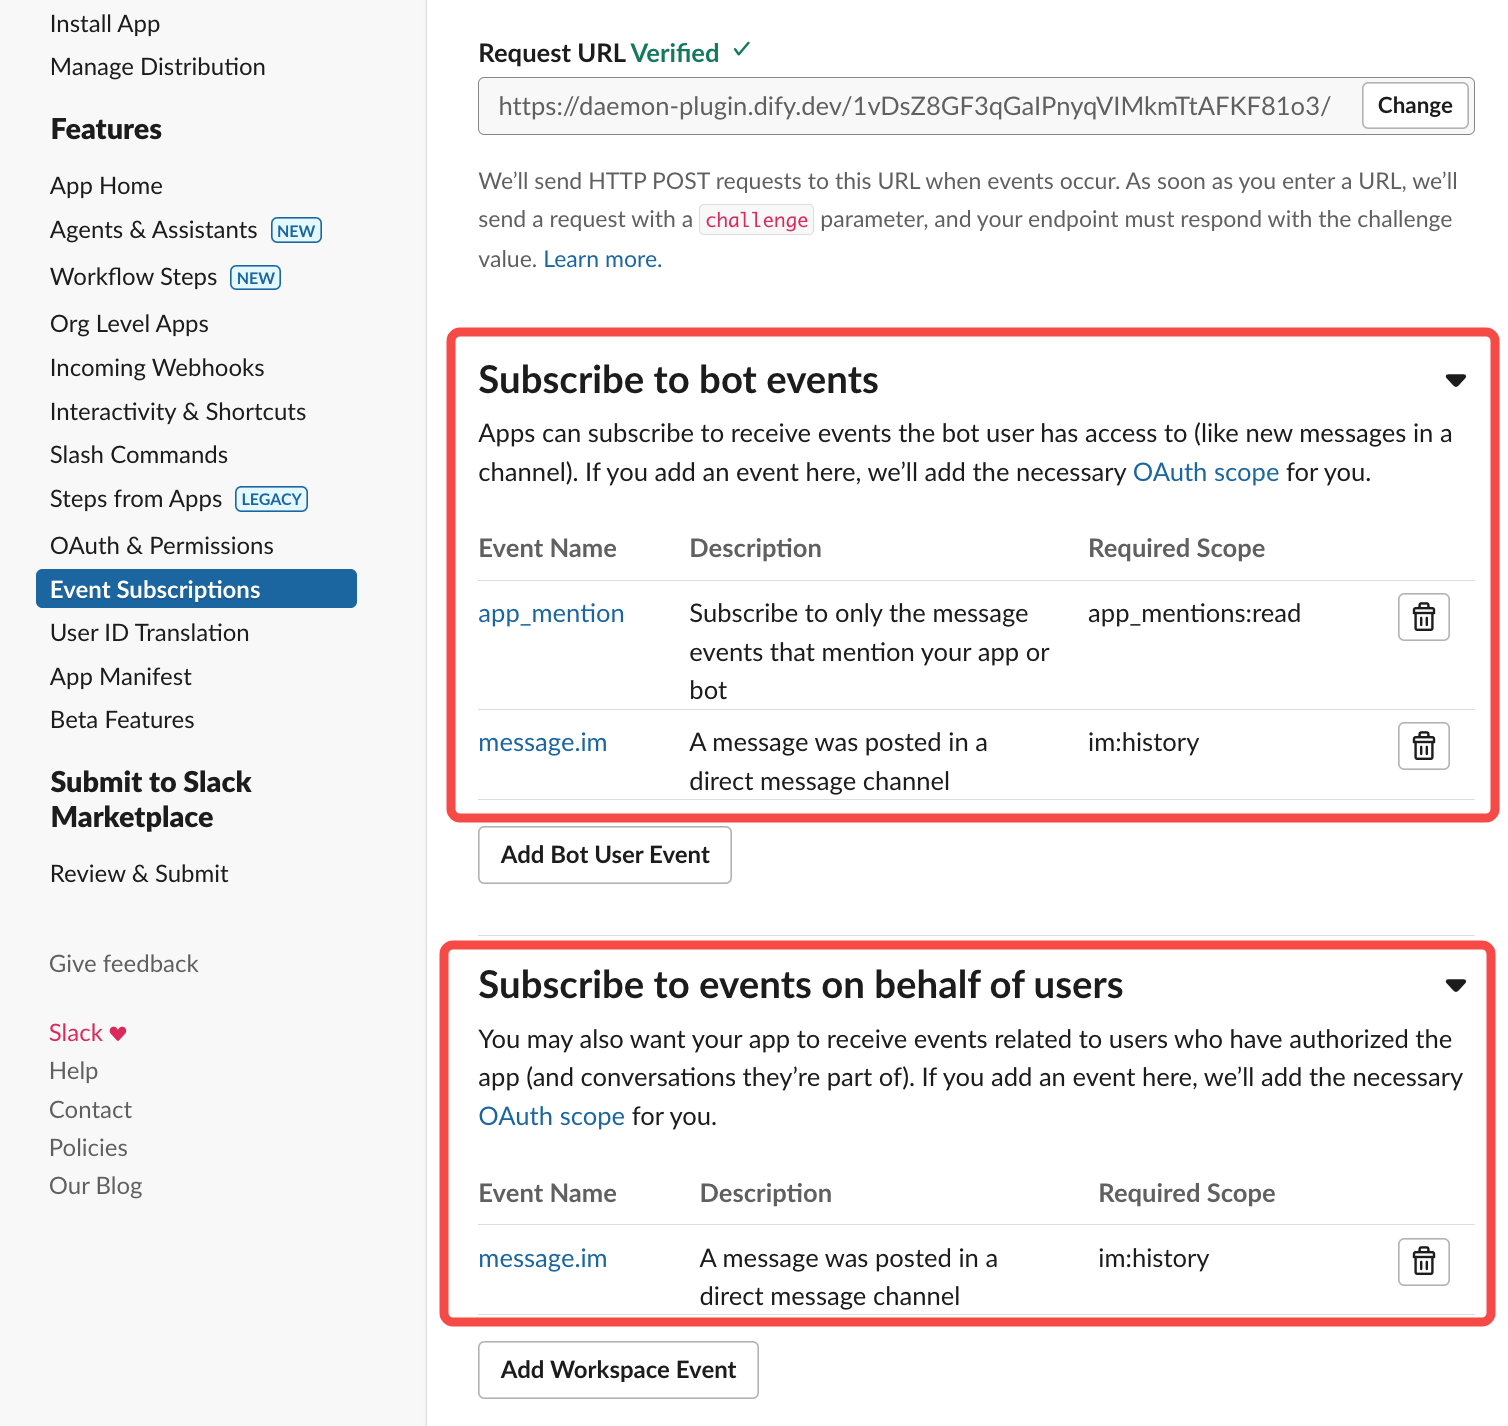
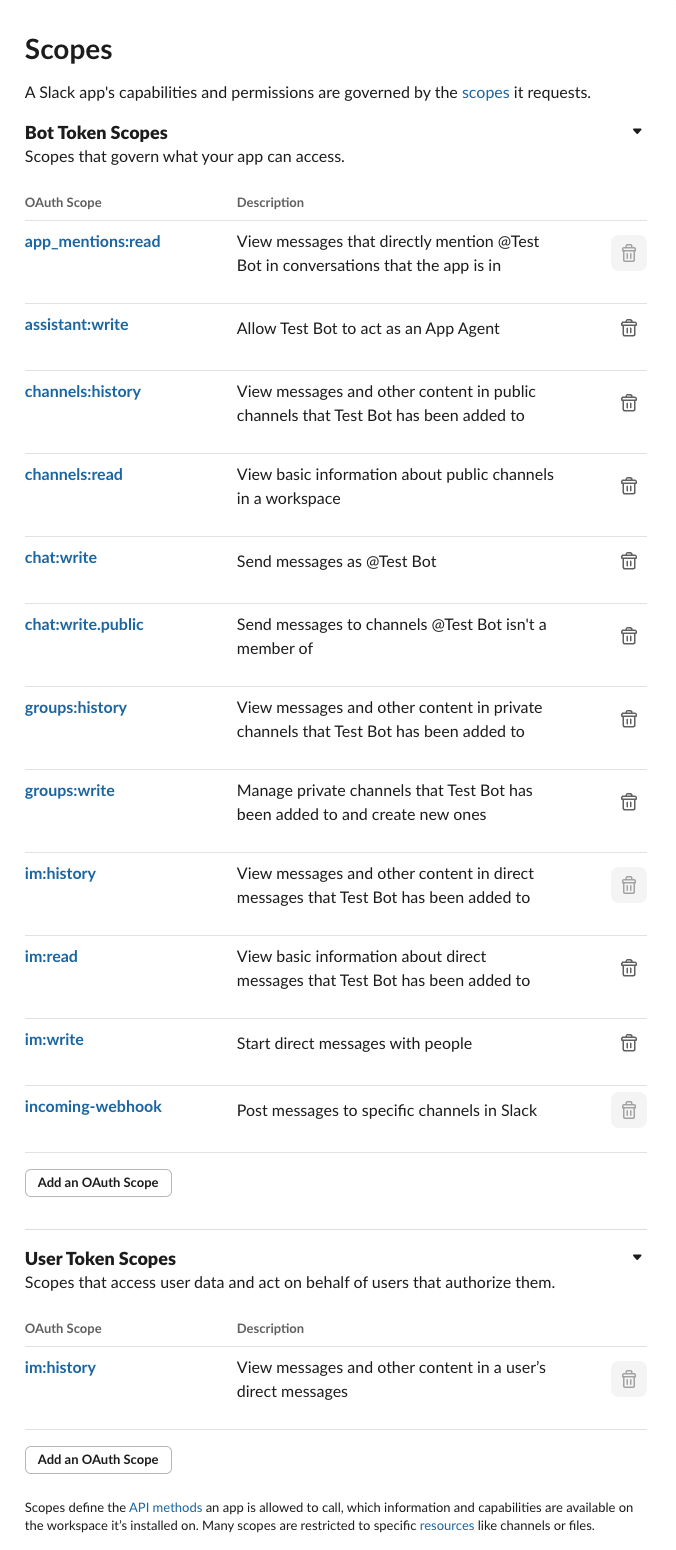
2. **Grant Required Permissions**
---
### 3. Verify the Plugin
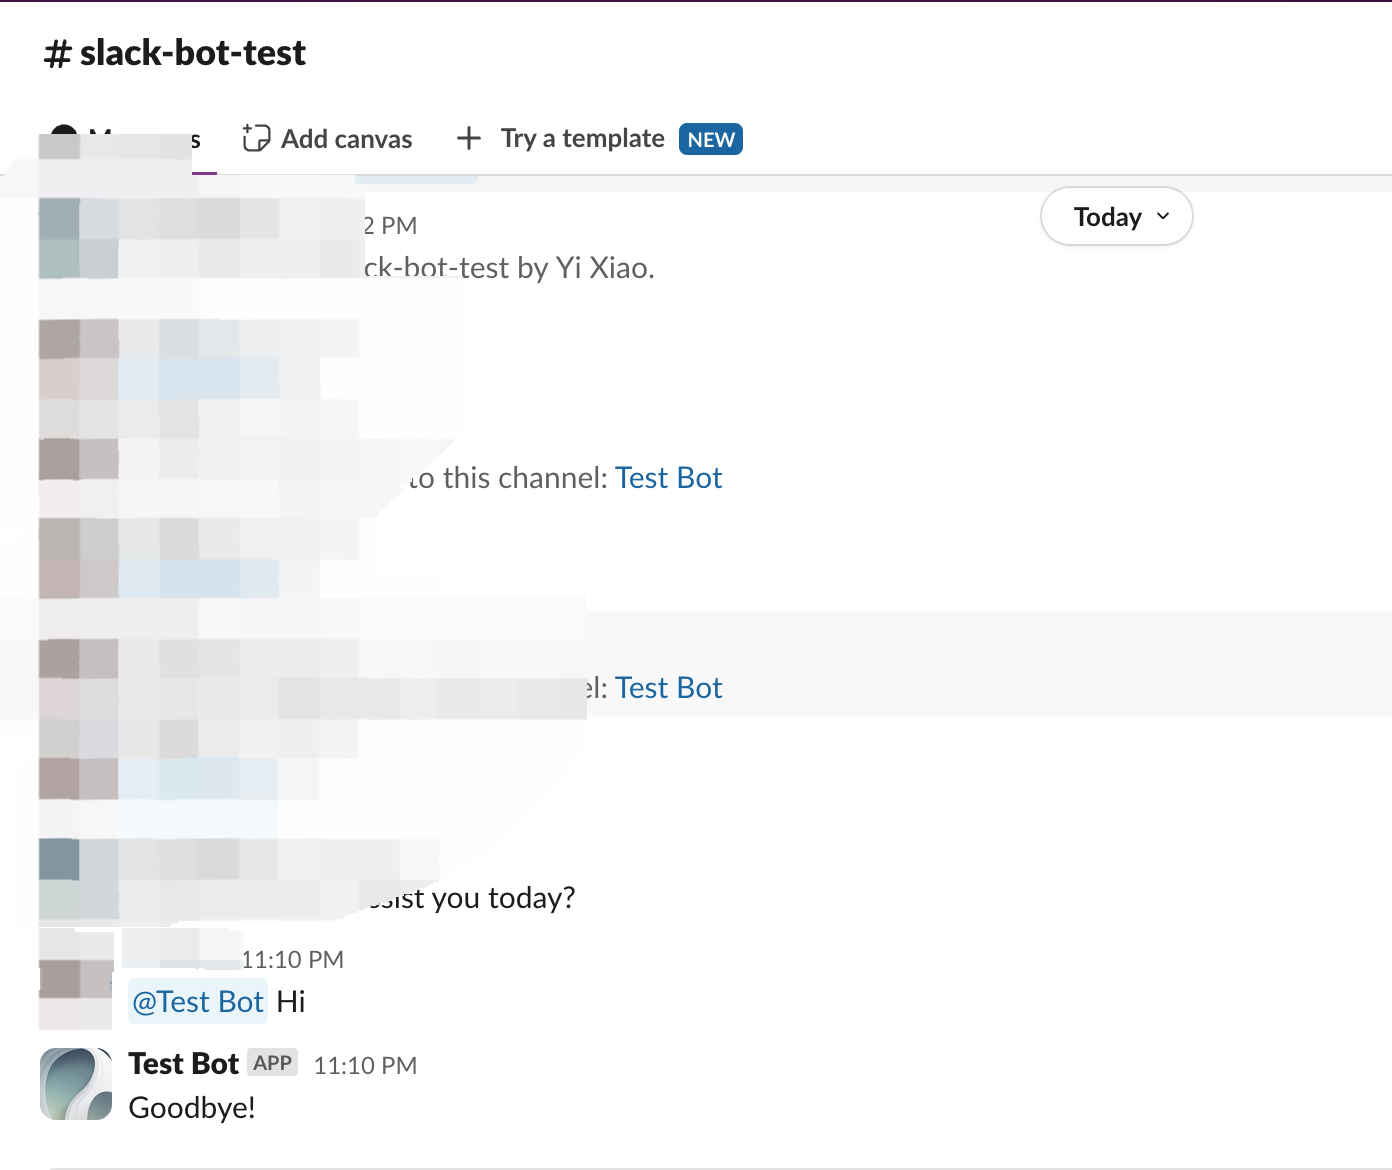
In your code, `self.session.app.chat.invoke` is used to call the Dify application, passing in parameters such as `app_id` and `query`. The response is then returned to the Slack Bot. Run `python -m main` again to restart your plugin for debugging, and check whether Slack correctly displays the Dify App’s reply:
---
### 4. Package the Plugin (Optional)
Once you confirm that the plugin works correctly, you can package and name it via the following command. After it runs, you’ll find a `slack_bot.difypkg` file in the current directory—your final plugin package. For detailed packaging steps, refer to [Package as a Local File and Share](/plugin-dev-en/0322-release-by-file).
```bash
# Replace ./slack_bot with your actual plugin project path.
dify plugin package ./slack_bot
```
Congratulations! You’ve successfully developed, tested, and packaged a plugin!
---
### 5. Publish the Plugin (Optional)
You can now upload it to the [Dify Marketplace repository](https://github.com/langgenius/dify-plugins) for public release. Before publishing, ensure your plugin meets the [Publishing to Dify Marketplace Guidelines](/plugin-dev-en/0322-release-to-dify-marketplace). Once approved, your code is merged into the main branch, and the plugin goes live on the [Dify Marketplace](https://marketplace.dify.ai/).
---
## Related Resources
- [Plugin Development Basics](/plugin-dev-en/0111-getting-started-dify-plugin) - Comprehensive overview of Dify plugin development
- [Plugin Development Quick Start Guide](/plugin-dev-en/0211-getting-started-dify-tool) - Start developing plugins from scratch
- [Develop an Extension Plugin](/plugin-dev-en/9231-extension-plugin) - Learn about extension plugin development
- [Reverse Invocation of Dify Services](/plugin-dev-en/9241-reverse-invocation) - Understand how to call Dify platform capabilities
- [Reverse Invocation: App](/plugin-dev-en/9242-reverse-invocation-app) - Learn how to call apps within the platform
- [Publishing Plugins](/plugin-dev-en/0321-release-overview) - Learn the publishing process
- [Publishing to Dify Marketplace](/plugin-dev-en/0322-release-to-dify-marketplace) - Marketplace publishing guide
- [Endpoint Detailed Definition](/plugin-dev-en/0432-endpoint) - Detailed Endpoint definition
### Further Reading
For a complete Dify plugin project example, visit the [GitHub repository](https://github.com/langgenius/dify-plugins). You’ll also find additional plugins with full source code and implementation details.
If you want to explore more about plugin development, check the following:
**Quick Starts:**
- [Develop an Extension Plugin](/plugin-dev-en/9231-extension-plugin)
- [Develop a Model Plugin](/plugin-dev-en/0211-getting-started-new-model)
- [Bundle Plugins: Packaging Multiple Plugins](/plugin-dev-en/9241-bundle)
**Plugin Interface Docs:**
- [Defining Plugin Information via Manifest File](/plugin-dev-en/0411-plugin-info-by-manifest) - Manifest structure
- [Endpoint](/plugin-dev-en/0432-endpoint) - Endpoint detailed definition
- [Reverse Invocation](/plugin-dev-en/9241-reverse-invocation) - Reverse-calling Dify capabilities
- [General Specifications](/plugin-dev-en/0411-general-specifications) - Tool specifications
- [Model Schema](/plugin-dev-en/0412-model-schema) - Model
{/*
Contributing Section
DO NOT edit this section!
It will be automatically generated by the script.
*/}
---
[Edit this page](https://github.com/langgenius/dify-docs/edit/main/plugin-dev-en/0432-develop-a-slack-bot-plugin.mdx) | [Report an issue](https://github.com/langgenius/dify-docs/issues/new?template=docs.yml)
Next, complete the Slack App setup:
1. **Enable Event Subscriptions**

Paste the POST request URL you generated above.

2. **Grant Required Permissions**

---
### 3. Verify the Plugin
In your code, `self.session.app.chat.invoke` is used to call the Dify application, passing in parameters such as `app_id` and `query`. The response is then returned to the Slack Bot. Run `python -m main` again to restart your plugin for debugging, and check whether Slack correctly displays the Dify App’s reply:

---
### 4. Package the Plugin (Optional)
Once you confirm that the plugin works correctly, you can package and name it via the following command. After it runs, you’ll find a `slack_bot.difypkg` file in the current directory—your final plugin package. For detailed packaging steps, refer to [Package as a Local File and Share](/plugin-dev-en/0322-release-by-file).
```bash
# Replace ./slack_bot with your actual plugin project path.
dify plugin package ./slack_bot
```
Congratulations! You’ve successfully developed, tested, and packaged a plugin!
---
### 5. Publish the Plugin (Optional)
You can now upload it to the [Dify Marketplace repository](https://github.com/langgenius/dify-plugins) for public release. Before publishing, ensure your plugin meets the [Publishing to Dify Marketplace Guidelines](/plugin-dev-en/0322-release-to-dify-marketplace). Once approved, your code is merged into the main branch, and the plugin goes live on the [Dify Marketplace](https://marketplace.dify.ai/).
---
## Related Resources
- [Plugin Development Basics](/plugin-dev-en/0111-getting-started-dify-plugin) - Comprehensive overview of Dify plugin development
- [Plugin Development Quick Start Guide](/plugin-dev-en/0211-getting-started-dify-tool) - Start developing plugins from scratch
- [Develop an Extension Plugin](/plugin-dev-en/9231-extension-plugin) - Learn about extension plugin development
- [Reverse Invocation of Dify Services](/plugin-dev-en/9241-reverse-invocation) - Understand how to call Dify platform capabilities
- [Reverse Invocation: App](/plugin-dev-en/9242-reverse-invocation-app) - Learn how to call apps within the platform
- [Publishing Plugins](/plugin-dev-en/0321-release-overview) - Learn the publishing process
- [Publishing to Dify Marketplace](/plugin-dev-en/0322-release-to-dify-marketplace) - Marketplace publishing guide
- [Endpoint Detailed Definition](/plugin-dev-en/0432-endpoint) - Detailed Endpoint definition
### Further Reading
For a complete Dify plugin project example, visit the [GitHub repository](https://github.com/langgenius/dify-plugins). You’ll also find additional plugins with full source code and implementation details.
If you want to explore more about plugin development, check the following:
**Quick Starts:**
- [Develop an Extension Plugin](/plugin-dev-en/9231-extension-plugin)
- [Develop a Model Plugin](/plugin-dev-en/0211-getting-started-new-model)
- [Bundle Plugins: Packaging Multiple Plugins](/plugin-dev-en/9241-bundle)
**Plugin Interface Docs:**
- [Defining Plugin Information via Manifest File](/plugin-dev-en/0411-plugin-info-by-manifest) - Manifest structure
- [Endpoint](/plugin-dev-en/0432-endpoint) - Endpoint detailed definition
- [Reverse Invocation](/plugin-dev-en/9241-reverse-invocation) - Reverse-calling Dify capabilities
- [General Specifications](/plugin-dev-en/0411-general-specifications) - Tool specifications
- [Model Schema](/plugin-dev-en/0412-model-schema) - Model
{/*
Contributing Section
DO NOT edit this section!
It will be automatically generated by the script.
*/}
---
[Edit this page](https://github.com/langgenius/dify-docs/edit/main/plugin-dev-en/0432-develop-a-slack-bot-plugin.mdx) | [Report an issue](https://github.com/langgenius/dify-docs/issues/new?template=docs.yml)